Top 12 Best Distance to Zero a Red Dot for Perfect Aim
Like many shooters, you want your red dot sight to be accurate and reliable. But knowing the best distance to zero a red dot can feel confusing.
Zeroing at the wrong range may affect your aim and performance. The [Product Name], a red dot sight designed for everyday shooters and professionals alike, aims to simplify this process. Whether you use it for target practice or tactical purposes, this sight offers clear adjustments and durable construction to help you get on target faster.
This review will explain how to find the best distance to zero a red dot, explore the features of the [Product Name], and share practical tips for setting it up. By the end, you’ll have a better understanding of how this product can suit your needs and improve your shooting experience.
Finding the Perfect Range for Unmatched Accuracy and Speed
| Image | Product | Price |
|---|---|---|
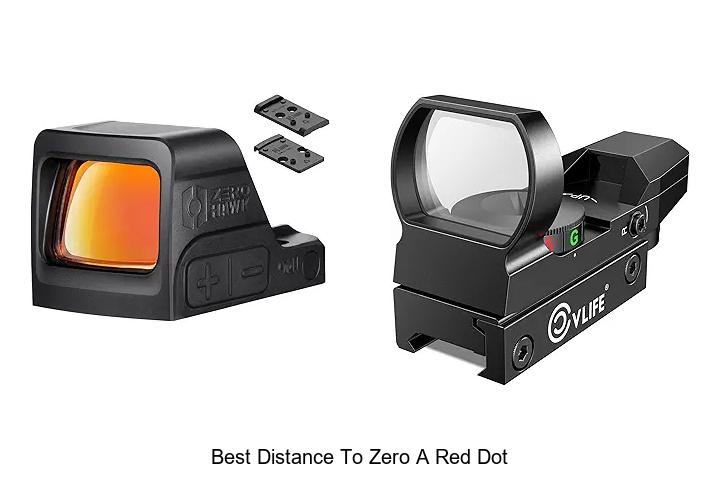
Our Top Picks 1  | OM1 Red Dot Sight, 2 & 32/2 & 6 MOA | Check Price |
Our Top Picks 2  | CVLIFE 1X22X33 Red Green Dot Gun Sight Scope Reflex Sight | Check Price |
Our Top Picks 3  | OM1 Red Dot Sight, 2 & 32/2 & 6 MOA | Check Price |
1. OM1 Red Dot Sight, 2 & 32/2 & 6 MOA
Discover precision and versatility combined in the OM1 Red Dot Sight, designed to enhance accuracy across diverse shooting situations. Its adaptable reticle system and crystal-clear optics provide shooters with the confidence to acquire targets swiftly and accurately under varied conditions.
Crafted for reliability, this compact sight incorporates advanced features that simplify operation while maintaining durability. Whether training at the range or engaging in dynamic scenarios, the OM1 promises consistent performance and ease of use.
The OM1 Red Dot Sight offers a unique multi-reticle system with 2 & 32 MOA options, including dot-only, circle-only, and dot-and-circle modes. This flexibility supports both precision targeting and rapid alignment, adapting effortlessly to different shooting styles. Such reticle variety is uncommon among optics within this category.
Its parallax-free design and multi-layer coated lens deliver a sharp, distortion-free view through an expansive window. Enhanced by glare reduction and hydrophobic coatings, the sight maintains clarity even in wet or dusty environments, improving target visibility.
Installation is straightforward with included mounting screws tailored to multiple footprints, covering a broad range of handguns. MOS-to-RMSc and RMR-to-RMSc adapter plates extend compatibility, allowing the optic to fit diverse firearm platforms.
Power efficiency is impressive, utilizing a CR1632 battery that provides up to 50,000 hours of runtime on mode The side-loading battery system enables quick replacement without removing the sight, preserving zero settings.
Constructed from 7075-T6 aluminum, the OM1 is both lightweight and robust. Rigorous testing confirms its resistance to shock, impact, moisture, and debris.
At just 96 oz, it maintains a low profile, avoiding bulk while providing excellent durability and reliability.
Pros
- Versatile reticle options for varied shooting needs
- Parallax-free optics with excellent glare and water resistance
- Side-loading battery design keeps zero during replacements
Cons
- Limited reviews could make evaluation challenging for some buyers
The OM1 Red Dot Sight strikes a balance between functionality, durability, and user-friendly features. This optic stands out with its multi-reticle system and ease of installation, offering excellent value for practical shooting applications.
Lightweight yet tough, it competes well against pricier models offering fewer reticle choices.
| Specification | Detail |
|---|---|
| Reticle Type | Multi Reticle (2 & 32 MOA: dot-only, circle-only, dot-and-circle) |
| Mounting Type | Integral Mount with MOS-to-RMSc and RMR-to-RMSc adapters |
| Battery | CR1632, side-loading, up to 50,000 hours runtime |
| Construction | 7075-T6 aluminum housing, shock and impact resistant |
| Weight | 0.96 oz (sight only) |
| Optics | Parallax-free, multi-layer coated lens with hydrophobic surface |
| Included Accessories | Nine sets of mounting screws, multi-tool, adapter plates |
From my perspective, the OM1 offers outstanding versatility for shooters seeking efficient target acquisition without sacrificing clarity or durability. Its easy battery replacement and broad compatibility make it a standout choice among red dot sights in its category.
2. CVLIFE 1X22X33 Red Green Dot Gun Sight Scope Reflex Sight
The CVLIFE 1X22X33 Red Green Dot Gun Sight Scope Reflex Sight offers remarkable versatility for varied shooting conditions. Designed with multiple reticle options and adjustable brightness levels, it adapts effortlessly to any environment. This sight delivers clarity and reliability with a simple, robust construction.
This sight delivers clarity and reliability with a simple, robust construction.
Whether on bright daylight or low-light scenarios, its wide field of view and lightweight design make targeting intuitive. Ideal for those seeking quick target acquisition without magnification, it balances performance with ease of use and durability.
This reflex sight features four distinct reticles: Dot, Circle/Dot, Crosshair/Dot, and Crosshair/Circle/Dot, allowing users to switch according to preference or shooting demands. Both red and green reticle colors come with five brightness settings, accommodating lighting from dawn to intense sunlight comfortably.
Constructed from high-grade aluminum alloy, the sight remains lightweight yet sturdy for consistent performance. Its absolute co-witness design fits standard 20mm Picatinny rails and includes an Allen wrench for straightforward installation. Parallax correction and unlimited eye relief ensure a reliable and comfortable aiming experience across various shooting positions.
Parallax correction and unlimited eye relief ensure a reliable and comfortable aiming experience across various shooting positions.
Accuracy relies on proper zeroing, and this sight holds zero well once set up correctly, making it suitable for rifles, carbines, and shotguns. Users who value adaptability and solid build quality will appreciate its balance of functionality and value. While not a magnifying optic, it provides rapid sight acquisition similar to iron sights but with modern enhancements.
While not a magnifying optic, it provides rapid sight acquisition similar to iron sights but with modern enhancements.
Pros
- Four reticle types with red and green illumination options
- Five brightness levels for adaptable visibility
- Durable aluminum alloy construction with easy Picatinny rail mounting
Cons
- No magnification; purely reflex sight functionality
The CVLIFE reflex sight stands as a practical choice for shooters needing flexible aiming solutions without magnification. It combines solid materials with easy adjustments tailored for various lighting conditions.
Perfectly suited for those wanting fast target alignment on multiple firearms, it performs reliably when properly zeroed.
| Specification | Details |
|---|---|
| Magnification | 1x |
| Objective Lens Diameter | 33 Millimeters |
| Compatible Rail | 20mm Picatinny Rail |
| Mounting Type | 20mm Picatinny Rail |
| Reticle Type | Dot, Circle/Dot, Crosshair/Dot, Crosshair/Circle/Dot |
| Brightness Levels | 5 Levels in Red & Green |
| Eye Relief | Unlimited |
| Parallax Correction | Yes |
| Night Vision Compatible | No |
Given its features and build, the CVLIFE red green dot sight is a reliable companion for varied shooting needs. It performs particularly well for users who understand the importance of accurate zeroing and quick target acquisition. Its versatility and straightforward operation make it a valuable addition to many firearms.
3. OM1 Red Dot Sight, 2 & 32/2 & 6 MOA
Experience precision and versatility with the OM1 Red Dot Sight, designed to enhance shooting accuracy across various scenarios. Its innovative multi-reticle system allows quick adaptation for targets at different distances.
Combining durable construction with user-friendly features, this optic delivers clarity and reliability on-demand. Ideal for tactical use and competitive shooting alike.
The OM1 Red Dot Sight stands out with its dual-reticle option, offering a 2 MOA dot for pinpoint long-range shots and a 6 MOA dot for faster aiming at close quarters. This flexibility caters to shooters aiming to balance precision and speed in real time. The large viewing window provides an expansive sight picture free of parallax distortion, enhanced by multi-layer coatings that reduce glare.
The hydrophobic lens coating helps maintain a clear view by repelling water and debris.
Installation is hassle-free, as the sight fits RMSc-cut slides straight from the box. Included adapter plates extend compatibility to MOS and RMR footprint handguns. The comprehensive set of anti-recoil screws comes neatly organized, ensuring a secure and reliable mount across diverse firearms.
The comprehensive set of anti-recoil screws comes neatly organized, ensuring a secure and reliable mount across diverse firearms.
Battery life impresses with up to 50,000 hours on mode 3, supported by a side-loading CR1632 battery that can be replaced without moving the optic or losing zero. Constructed from 7075-T6 aluminum, the sight withstands moisture, debris, and significant impact, validated by rigorous shock and drop tests.
Despite its rugged build, it remains lightweight at less than one ounce, keeping your firearm agile without extra bulk. Intuitive controls and the included multitool add to the overall convenience, making this red dot well-suited for training, competition, and tactical engagements.
Pros
- Multi-reticle design for versatile aiming needs
- Parallax-free optics with anti-glare, hydrophobic coating
- Easy battery replacement without removing the sight
Cons
- Limited number of existing user feedback available
Reliable in demanding conditions and adaptable to multiple firearms, the OM1 Red Dot Sight offers excellent value through its precision and durability. The thoughtfully designed mounting options and long battery life make it a practical choice.
Below is a detailed specification overview to assist your evaluation.
| Feature | Specification |
|---|---|
| Reticle Types | 2 MOA and 6 MOA Dots |
| Mounting | Integral RMSc Mount, MOS-to-RMSc and RMR-to-RMSc Adapters Included |
| Optics | Parallax-Free, Multi-Layer Coated Lens with Hydrophobic Surface |
| Battery | CR1632, Side-Loading, Up to 50,000 Hours Runtime |
| Material | 7075-T6 Aluminum Housing |
| Weight | 0.96 oz (Sight Only) |
| Durability | Shock Tested (5,000G), Drop Tested, Moisture and Debris Resistant |
This red dot sight strikes a well-considered balance between rugged construction and user convenience. Its long-lasting battery and easy customization suit a wide range of shooting activities. For those seeking a reliable optic without excessive complexity, this model deserves close attention.
4. Feyachi RDS-22 2 MOA Red Dot Sight Compact Red Dot

Precision and reliability come together in the Feyachi RDS-22 2 MOA Red Dot Sight. Designed for fast target acquisition and accurate shooting, it offers clear optics paired with a compact design.
This red dot sight is a practical choice for anyone seeking to improve shooting performance.
Whether you are hunting or engaged in tactical training, the RDS-22 delivers consistent results. Its 2 MOA dot size suits both close-range engagements and precise shots at longer distances, providing versatility in various shooting scenarios.
Built with a robust aluminum body, the sight withstands rough handling and harsh environments. It is fully waterproof, nitrogen-purged, and sealed with O-rings, ensuring durability and reliability in unpredictable conditions. The matte black anodized finish also reduces glare while protecting against scratches.
The matte black anodized finish also reduces glare while protecting against scratches.
The fully multi-coated lenses enhance light transmission for clear sight pictures in low-light situations, improving visibility when it matters most. Adjustable brightness with 11 different settings allows the shooter to adapt easily to different lighting, including bright daylight or dim surroundings.
Mounting is straightforward with the Picatinny rail system compatibility, allowing quick installation on various firearms. With unlimited eye relief, the sight offers a natural viewing experience for both-eyes-open shooting, which speeds up target acquisition.
This red dot sight is well-suited for hunters, tactical shooting, and everyday firearm users who want a reliable optic without complex features. Its compact size keeps the setup sleek while maintaining high performance and ease of use.
Pros
- Sharp 2 MOA red dot for precise aiming at various distances
- Durable, waterproof aluminum housing with nitrogen purge and O-ring seal
- Eleven brightness settings for adaptable visibility during any light conditions
Cons
- No night vision compatibility
The Feyachi RDS-22 offers a fine balance between durability, ease of use, and accuracy, making it a solid option for close to medium-range shooting. Its practical design and reliable performance make zeroing straightforward and consistent.
| Specification | Details |
|---|---|
| Magnification | 1x |
| Objective Lens Diameter | 22 mm |
| Mounting Type | Picatinny Mount |
| Reticle Type | Red Dot (2 MOA) |
| Eye Relief | Unlimited |
| Brightness Settings | 11 Levels |
| Night Vision Compatible | No |
| Construction | Shockproof Aluminum Body, Matte Black Anodized |
| Waterproof | Yes |
For users seeking a dependable red dot sight, this model combines strong construction with user-friendly features. It maintains zero well and adjusts smoothly, fitting a wide range of shooting activities.
5. Feyachi M40 3X Red Dot Magnifier with Flip to Side

Experience enhanced target acquisition with the Feyachi M40 3X Red Dot Magnifier. Designed to add a powerful 3X zoom to your existing red dot sight, it maintains a wide field of view and provides excellent eye relief for comfortable aiming. Its quick flip-to-side feature allows seamless transition between magnified and unmagnified views in the field.
Its quick flip-to-side feature allows seamless transition between magnified and unmagnified views in the field.
The magnifier delivers bright, clear visuals using fully multicoated glass, optimizing light transmission and color accuracy. Built with durable machined aluminum and anodized finish, it withstands harsh conditions while resisting fog, water, and shocks. Adjustable windage and elevation help fine-tune the sight for precise target centering, making shooting more accurate and enjoyable.
Adjustable windage and elevation help fine-tune the sight for precise target centering, making shooting more accurate and enjoyable.
Adding a 3X magnification effortlessly complements your red dot scope, especially models with lower 1/3 co-witness or absolute co-witness configurations. The included quick-release mount features a push-button mechanism, ensuring fast engagement and secure locking.
The 96mm (
This feature is ideal for shooters who require rapid target acquisition over varying ranges. Its construction emphasizes both ruggedness and portability, striking a balance between durability and manageable weight for extended use.
Pros
- 3X magnification with clear, multicoated optics for sharp imaging
- Quick flip-to-side mount with push-button lock for fast operation
- Durable construction featuring anodized aluminum and nitrogen purge
Cons
- Heavier than some competitors, which may affect balance
The Feyachi M40 red dot magnifier merges ease of use with solid performance, enhancing your shooting experience without compromise. Its rugged design and functional features make it a practical upgrade for those looking to extend the effective range of their red dot sights. Compared to similar magnifiers, it stands out with its quick-release mounting and focused optics.
Compared to similar magnifiers, it stands out with its quick-release mounting and focused optics.
| Specification | Details |
|---|---|
| Magnification Maximum | 3x |
| Magnification Minimum | 3x |
| Objective Lens Diameter | 23 mm |
| Compatible Devices | Rifles, Handguns |
| Mounting Type | Side Mount |
| Night Vision | No |
| Eye Relief | 60.96 mm (2.4 inches) |
| Reticle Type | Red Dot |
From personal observation, the Feyachi M40 balances optical clarity with ruggedness effectively. While a bit heavier than expected, it offers confidence for demanding conditions and quick target adjustments. Its value lies in offering reliable magnification and user-friendly features that fit well into most tactical setups.
Its value lies in offering reliable magnification and user-friendly features that fit well into most tactical setups.
6. CVLIFE EagleFeather S04 Red/Green Dot Sight & 3X Magnifier Combo

Enhance your shooting experience with the CVLIFE EagleFeather S04 Red/Green Dot Sight & 3X Magnifier Combo. Designed for precision and durability, this optic setup delivers clear targeting from close to mid-range distances.
The combination of a vibrant red/green dot and a powerful magnifier allows shooters to adapt quickly to different scenarios. Whether engaged in tactical training or casual shooting, this combo supports faster target acquisition with accuracy and ease.
The CVLIFE JackalHowl red dot sight features a sturdy 6061 aluminum alloy construction, rated to withstand shocks up to 1200G. This means it holds up well under recoil and rough handling. Powered by a single CR2032 battery, it can deliver an impressive runtime of up to 50,000 hours, making battery changes infrequent.
Its motion awake technology saves power by shifting to sleep mode after four minutes without movement. Upon detecting motion, the sight immediately reactivates at the last brightness setting, including ten adjustable brightness levels and two for night vision. This flexibility ensures visibility in diverse lighting environments.
The included 3X magnifier enhances your effective reach by tripling magnification while maintaining a broad 36-inch eye relief. This ensures comfort and situational awareness, a necessity when switching between targets at varying distances.
Additionally, the 20mm fully multi-coated lenses improve light transmission, offering a crisp 2MOA red dot that quickens target acquisition with both eyes open.
Mounting flexibility is key with the combo; it comes with both an absolute co-witness mount and a low Picatinny mount. The absolute co-witness allows simultaneous use with iron sights and perfect alignment with the magnifier.
Solid build and reliable zero retention mean consistent performance over repeated use without frequent zeroing.
This setup suits shooters seeking versatile optics without sacrificing durability or performance. It offers features that are often found in higher-end sights but available here at a more approachable level.
Easy installation and intuitive operation add to its practical appeal for a wide range of users.
Pros
- Rugged 6061 aluminum alloy body with 1200G shock resistance
- Motion awake feature conserves battery with instant-on capability
- 3X magnifier with wide 2.36-inch eye relief for extended targeting
Cons
- Magnifier is not compatible with night vision use
The CVLIFE EagleFeather S04 Red/Green Dot Sight & 3X Magnifier Combo balances durability, precision, and ease of use in one package. Its reliable zero retention and versatile mounting options make it a valuable addition for shooters wanting adaptability. Compared to other red dot combos, this unit offers solid performance enhancements for mid-range shooting, standing out for its price-to-value ratio.
Compared to other red dot combos, this unit offers solid performance enhancements for mid-range shooting, standing out for its price-to-value ratio.
| Specification | Details |
|---|---|
| Magnification Maximum | 3x |
| Objective Lens Diameter | 20 Millimeters |
| Compatible Devices | Airsoft Gun |
| Mounting Type | Absolute Co-witness & Low Picatinny Mount |
| Night Vision Compatibility | No |
| Reticle Type | Red Dot (2 MOA) |
Overall, this combo delivers an impressive optical package with features that enhance both accuracy and targeting comfort. Its build quality and smart power management offer confidence for varied shooting conditions. Users valuing reliable optics for both beginner and intermediate setups will find considerable satisfaction with this model.
7. CVLIFE 3X Red Dot Magnifier with Quick-Release and Flip-to-Side Mount,2.95in

Elevate your shooting precision with the CVLIFE 3X Red Dot Magnifier, designed to enhance target visibility effortlessly. The quick-release and flip-to-side mount add unmatched flexibility for rapid adjustment between magnified and unmagnified views.
Crafted from durable aluminum, this magnifier’s ergonomic design caters to both right- and left-handed users. Its clear optics and comfortable eye relief contribute to a seamless shooting experience at various distances.
The CVLIFE 3X Red Dot Magnifier combines versatility and robustness in a compact form. Adjustable mounting heights using shims allow you to set the magnifier at absolute co-witness height or at different levels suitable for your red dot sight setup.
Direct external windage and elevation adjustments simplify sighting corrections without needing tools, saving time on the range or in the field. The flip-to-side quick-release system enables swift switching between a 1x red dot and 3x magnification, which is ideal for engaging targets at closer or longer ranges.
With 95 inches of eye relief and a wide
3-foot field of view at 100 yards, the magnifier delivers a comfortable sight picture. The ±5° diopter adjustment ensures sharp focus tailored to your vision.
Constructed from aircraft-grade 6061 T6 aluminum, the anodized finish resists scratches and wear, complemented by a shockproof design rated for recoil up to 1000G.
This unit features full waterproofing with an IP67 rating and nitrogen filling to prevent fogging in harsh weather. Weighing just 430 grams, it balances durability and portability well.
Pros
- Quick-release and flip-to-side mount for rapid adjustment
- Adjustable shim system for versatile mounting height options
- Sharp 3x magnification with 2.95″ eye relief and wide field of view
Cons
- May not suit shooters requiring magnification beyond 3x
The CVLIFE 3X Red Dot Magnifier offers a sturdy, adaptable solution for shooters aiming to improve target acquisition at various distances. Its quick-release mount and precise adjustment capabilities make it an excellent companion for many red dot sights.
With enhanced durability and clear optics, it stands out for reliable performance under recoil and diverse conditions.
| Specification | Details |
|---|---|
| Magnification | 3x |
| Objective Lens Diameter | 24.89 mm (0.98 in) |
| Eyepiece Diameter | 1.1 in |
| Eye Relief | 2.95 in |
| Field of View | 48.3 ft at 100 yards |
| Diopter Adjustment Range | ±2.5° |
| Shockproof Rating | 1000G |
| Waterproof Rating | IP67 |
| Material | 6061 T6 Aluminum |
| Weight | 430g |
| Nitrogen Filling | Yes |
| Mounting Type | Picatinny Quick Release, Flip-to-Side |
Having tested various magnifiers, the CVLIFE 3X stands out with its balance of build quality and ease of use. Its quick-release mount is superb for switching optics during dynamic shooting. While higher magnification options exist, this model suits most tactical and hunting needs without adding bulk or complexity.
8. CVLIFE Solar Enclosed Red Dot Sight, Multi-Reticle 2 MOA Dot

Experience precision and durability with the CVLIFE Solar Enclosed Red Dot Sight. Designed for quick target acquisition, this red dot sight combines reliability and innovative solar technology.
Its enclosed design offers protection against environmental elements, enhancing performance in varied conditions.
Switching between a 2 MOA dot and a 30 MOA circle gives you flexibility for diverse shooting scenarios. Compact and versatile, this sight suits both handgun and rifle platforms, delivering clear visuals without distortion or parallax issues.
The CVLIFE sight features a fully enclosed emitter protected by a rugged housing, preventing dust, water, and debris intrusion. This sturdy construction supports reliable operation during outdoor and tactical use.
Its aspherical lens provides a distortion-free view, allowing for crisp and fast target engagement.
Users can toggle between a precise 2 MOA red dot and a 30 MOA circle reticle. This versatility accommodates different aiming preferences and shooting distances.
The solar-powered system works alongside a battery to extend runtime, giving up to 100,000 hours of use in natural light without frequent battery changes.
Mounting is simplified with included adapter plates tailored for RMR footprints and Glock MOS systems. Although some rail mount options present minor tightening challenges, the core mounting solutions maintain a secure zero.
With its combination of solid build quality, energy efficiency, and reticle customization, this red dot sight is well-suited for shooters seeking accuracy and dependability. Its wide compatibility and clear optics provide excellent value for practical shooting, training, and personal defense setups.
Pros
- Durable enclosed design protects emitter from elements.
- Dual reticle options for tailored targeting (2 MOA dot and 30 MOA circle).
- Solar and battery power combination extends battery life significantly.
Cons
- Some Picatinny rail mounts exhibit slight play affecting tightness.
This red dot sight offers a balance of ruggedness, clarity, and power efficiency that benefits a broad range of shooters. Its innovative solar power feature sets it apart from many similar optics.
While certain mounting plates may require adjustment, the sight consistently holds zero in compatible setups. Below is a quick overview of technical specifications for easy reference.
| Specification | Details |
|---|---|
| Reticle | Red 2 MOA Dot & 30 MOA Circle |
| Magnification | 1x |
| Parallax | Parallax Free |
| Eye Relief | Unlimited |
| Power Source | Solar & Battery (CR1632) |
| Battery Life | Up to 50,000 hours |
| Brightness Settings | 7 Daylight & 1 Night Vision compatible |
| Window Size | 0.79 x 0.79 inches |
| Housing Material | 6061 Aluminum |
| Surface Finish | Anodized |
| Adjustment per Click | 1 MOA |
| Windage & Elevation Travel | ±30 MOA |
| Mounting | Adapter plates for MOS & RMR footprints |
| Compatible Devices | Handgun, Rifle |
| Night Vision Compatibility | Yes |
In my experience, the CVLIFE Solar Enclosed Red Dot Sight combines practicality with advanced features. Its adaptability across platforms and efficient power system make it a dependable tool for both casual shooting and serious training.
9. Feyachi Bore Sight 9MM/223 5.56/12GA Red Dot Laser Zeroing Bore

Feyachi Bore Sight 9MM/223 56/12GA Red Dot Laser provides a precise and convenient method for quickly zeroing your firearm. Its compact design and bright red laser make sighting adjustments straightforward and efficient, saving time and ammunition during the zeroing process.
Its compact design and bright red laser make sighting adjustments straightforward and efficient, saving time and ammunition during the zeroing process.
The durable brass construction fits securely in the bore, ensuring consistent alignment. Perfectly suited for those looking to streamline their sighting setup, this bore sight supports calibers such as 9mm, .
56, and 12 gauge, making it a versatile tool for various firearms.
Precision is the key advantage of this laser bore sight, offering a Class IIIA red laser with less than 5mW power at the 632-650nm wavelength. The high visibility red dot facilitates rapid zeroing at distances beyond 50 yards, allowing for faster target acquisition and increased accuracy.
Its compact size of 29 by 39 by 1 inch ensures easy insertion and removal without adding unnecessary bulk.
The set includes three pairs of upgraded batteries, each providing up to one hour of use to keep the laser functioning reliably. The bore sight is chamber-specific, designed to fit 9mm calibers securely, but models are available for other common calibers as well.
Ease of use is enhanced by the lightweight, compact build and straightforward battery installation procedure. Users can quickly achieve accurate zeroing without consuming excessive rounds, making it especially useful for hunters, competitive shooters, and firearm owners aiming for a faster setup. Compared to similar products, Feyachi strikes a balance between affordability, precision, and build quality, giving it standout value.
Compared to similar products, Feyachi strikes a balance between affordability, precision, and build quality, giving it standout value.
Pros
- Bright, clear red laser aiding fast and accurate zeroing
- Durable brass construction ensures long-lasting use
- Includes multiple battery sets for extended usage
Cons
- Some optics zeroed with it may not consistently hold zero
Offering a practical and straightforward solution for firearm zeroing, the Feyachi Bore Sight is a solid choice for users who want to save time and rounds. Its design supports precision and durability in a compact package, making sighting adjustments more accessible.
Whether zeroing handguns or rifles, this bore sight performs reliably and provides good value for its features.
| Feature | Specification |
|---|---|
| Laser Class | Class IIIA, <5mW |
| Laser Wavelength | 632-650nm Red |
| Size | 0.29 x 0.39 x 1 in |
| Caliber Compatibility | 9MM (Other calibers available) |
| Batteries Included | 3 sets (6 total), up to 1 hour each |
| Material | Brass |
| Mounting Type | Picatinny Mount |
| Reticle Type | Dot |
The straightforward design combined with reliable performance makes this bore sight a practical tool. Ideal for those needing quick sight-in sessions, it balances quality and ease of use. While some users may experience challenges with zero retention on certain optics, its affordability and precision make it worthy of consideration for beginners and experienced shooters alike.
10. MidTen Motion Awake Green Dot Sight, 2 MOA Green Dot

Experience a sharper aiming solution with the MidTen Motion Awake Green Dot Sight. Its innovative motion-activated sleep mode conserves battery life by powering down during inactivity.
The green dot enhances sight clarity, reducing eye strain and providing a crisp reticle visible in various lighting. This sight combines durability with adaptable mounting to fit diverse shooting needs effectively.
The MidTen green dot sight delivers precise targeting through a 2 MOA reticle that balances speed and accuracy at close and extended ranges. Eleven brightness levels accommodate different environments, from low light to bright sunlight, adjusting easily to your surroundings. Its green illumination is designed to minimize starburst effects, which benefits users with astigmatism.
Crafted from aviation aluminum alloy, the sight resists scratches and endures heavy recoil with its 1000G shock resistance. It holds zero reliably under demanding conditions, supported by nitrogen purging and O-ring seals for waterproof and fog-proof performance rated at IPX7.
Two mount options—low profile and lower 1/3 co-witness—offer versatility on a 21mm Picatinny rail, enhancing field of view and sighting speed. With an easy-to-replace CR2032 battery, it achieves up to 2,000 hours of runtime on moderate brightness settings.
This sight fits airsoft guns and similar platforms, catering well to users seeking consistent and dependable optic performance.
Pros
- Automatic motion-activated sleep mode conserves battery life.
- Green dot with 11 brightness levels to suit various lighting conditions.
- Robust construction with waterproof, fog-proof, and shock-resistant features.
Cons
- Brightness adjustment may require familiarity to quickly find preferred setting.
Offering excellent reliability and adaptability, the MidTen Motion Awake Green Dot Sight meets the demands of shooters needing a durable and clear optic. Its unique motion wake technology and multiple mounting choices enhance ease of use in different scenarios. Suitable for a range of shooting platforms, it stands as a practical upgrade over typical red dot sights.
| Specification | Details |
|---|---|
| Reticle | Green 2 MOA Dot |
| Brightness Levels | 11 Settings |
| Magnification | 1x |
| Eye Relief | Unlimited, Parallax Free |
| Mount Options | Low Profile & Lower 1/3 Co-Witness |
| Construction Material | Aviation Aluminum Alloy |
| Surface Finish | Matte Black Anodized |
| Waterproof & Fog-proof | IPX7 Rated |
| Shock Resistance | 1000G |
| Power Source | CR2032 Battery |
| Battery Life | Up to 2,000 Hours (Mid Settings) |
| Window Size | 20 mm |
For users looking for a green dot sight that blends clarity, durability, and convenience, the MidTen model offers a compelling option. It performs reliably across lighting conditions and holds zero under recoil, making it a strong contender within its category.
11. CVLIFE EagleFeather Multiple Reticle Red/Green Dot and Magnifier Combo, 40mm

Experience precision and versatility with the CVLIFE EagleFeather Multiple Reticle Red/Green Dot and Magnifier Combo. Designed to enhance targeting accuracy, this 40mm sight offers clear visuals and adjustable reticle options for varying conditions.
Whether for professional use or recreational shooting, it delivers reliable performance at medium to long distances.
The combo includes a 3X magnifier and a bright red/green dot sight, ensuring clear targeting with a comfortable 36-inch eye relief.
Its four reticle patterns, including dot and crosshair variations, provide flexibility to suit different shooting scenarios. Brightness is adjustable across eight levels, allowing fine-tuning from bright sunlight to dusk visibility. Crafted from high-grade aluminum alloy, this setup is both lightweight and durable.
The shockproof, waterproof, and fogproof design ensures steady functionality in harsh environments. Installation is straightforward with the included Picatinny rail mount and the magnifier’s flip-to-side feature, ideal for quick transitioning between magnified and unmagnified views.
With a 40mm lens, the sight offers a broad and clear field of view, enhanced by anti-glare coating and parallax correction. Diopter adjustment on the magnifier further refines focus, catering to individual eyesight needs.
This combo is well-suited for shooters aiming to improve accuracy without compromising situational awareness and durability.
Pros
- Multiple reticle options with adjustable brightness for versatile targeting
- Robust build combining shockproof, waterproof, and fogproof features
- Easy installation with Picatinny rail and flip-to-side magnifier mount
Cons
- Not compatible with red dot sights featuring lower 1/3 co-witness systems
The CVLIFE EagleFeather combo successfully balances performance and durability for shooters who demand precision. Its customizable reticles and clarity enhancements make aiming easier across different environments.
| Feature | Specification |
|---|---|
| Magnification | 3x |
| Objective Lens Diameter | 40 mm |
| Reticle Options | Dot, Circle/Dot, Crosshair/Dot, Crosshair/Circle/Dot |
| Brightness Levels | 8 |
| Mount Type | Picatinny |
| Eye Relief | 2.36 inches (60 mm) |
| Compatibility | Absolute co-witness height red dot sights |
| Build Material | High-grade aluminum alloy |
For users requiring a reliable and adaptable sight combo, this model is a strong option. The focus adjustment and multiple reticle choices support various shooting styles and distances.
It stands out compared to similar combos thanks to its sturdy construction and ease of use.
12. CVLIFE WolfProwl Multiple Reticle Red Dot Sight, 2 MOA Dot

Experience precision and adaptability with the CVLIFE WolfProwl Multiple Reticle Red Dot Sight. Designed to provide quick target acquisition and enhanced accuracy, this sight suits a variety of shooting distances.
Its versatile reticle options cater to different scenarios, from close-range engagements to precise long-range shots.
Built to perform under demanding conditions, the sight’s durable construction and weatherproof design are ideal for rugged environments. Whether preparing for tactical use or casual shooting, it ensures consistent performance and reliability.
The CVLIFE WolfProwl Red Dot Sight stands out with its three selectable reticle patterns, including a 2 MOA dot ideal for long-range precision, and a 32 MOA circle dot suited for closer targets. Switching between reticles is straightforward, achieved by holding the + button for two seconds.
Equipped with motion activation technology, the sight conserves power by entering sleep mode after four minutes of inactivity. Reactivation happens instantly with a gentle tap or tilt, preserving your previous brightness settings for uninterrupted use.
Users can also disable the dot and motion sensor by holding the – button for two seconds, offering full control over the device’s functions.
The housing is crafted from aircraft-grade aluminum, delivering toughness and reliability in extreme conditions. IPX7 waterproof certification ensures protection against wet environments, while a shock resistance rating of 1500G maintains zero despite heavy recoil.
With up to 50,000 hours of battery life, it guarantees extended usage without frequent maintenance.
Ideal for handguns fitting RMR footprints and mounted with a Picatinny rail, this sight provides 1x magnification with no parallax and infinite eye relief. Brightness settings include eight daylight and two night vision modes to accommodate various lighting scenarios.
Pros
- Multiple reticle options for diverse shooting distances
- Motion activation technology extends battery life
- Rugged, waterproof, and shock-resistant construction
Cons
- No integrated night vision compatibility
The CVLIFE WolfProwl Multiple Reticle Red Dot Sight offers exceptional value by blending versatility, durability, and user-friendly features. It holds zero well during heavy use and performs consistently across varied conditions, making it a dependable choice for those seeking precise aiming solutions.
| Specification | Details |
|---|---|
| Reticle Types | 2 MOA Red Dot & 32 MOA Circle Dot |
| Magnification | 1x |
| Compatible Devices | Handgun with RMR Footprint |
| Mounting Type | Picatinny Mount |
| Battery Type | CR1632 |
| Battery Life | Up to 50,000 hours |
| Brightness Settings | 8 Daylight, 2 Night Vision |
| Housing Material | Aircraft-grade Aluminum |
| Waterproof Rating | IPX7 |
| Shock Resistance | 1500G |
| Adjustment per Click | 1 MOA |
| Windage & Elevation Travel Range | ±45 MOA |
From personal experience, this red dot sight impresses with its solid build and intuitive controls. The motion activation is genuinely useful for managing battery life, and reticle switching is quick during use. It stands as a reliable optic for both casual shooters and tactical setups seeking precise, versatile aiming.
It stands as a reliable optic for both casual shooters and tactical setups seeking precise, versatile aiming.
Best Distance to Zero a Red Dot: Quick Buying Guide
Understanding zeroing distance for red dot sights
Understanding zeroing distance for red dot sights involves grasping how far away the point of aim and point of impact align when the sight is properly adjusted. Zeroing distance refers to the specific range at which the red dot’s reticle sits directly on the target without requiring compensation for bullet drop or deviation. Common zeroing distances like 25, 50, or 100 yards correspond to different uses; shorter distances are practical for close-quarters shooting or self-defense scenarios, while longer distances suit target shooting and hunting.
Common zeroing distances like 25, 50, or 100 yards correspond to different uses; shorter distances are practical for close-quarters shooting or self-defense scenarios, while longer distances suit target shooting and hunting. The chosen zeroing distance impacts accuracy because it determines how the point of aim matches the bullet’s trajectory at various ranges. Setting this distance thoughtfully can help shooters quickly and confidently hit targets within their typical engagement zones, making it easier to maintain precision without constant adjustments during use.
Ballistics and trajectory factors
Understanding the best distance to zero a red dot involves recognizing how bullet drop and trajectory change over various ranges. When you zero a red dot sight, the distance you choose affects where the bullet impacts relative to the point of aim at different distances.
The impact of zeroing distance extends to different ammunition types as their velocity and ballistic properties influence trajectory differently. Adjusting the zero to accommodate these variations ensures improved accuracy and consistency, especially when switching between lighter or heavier bullets.
Selecting a zero distance that aligns with your common shooting scenarios, such as close-quarters or mid-range engagements, helps streamline aiming without requiring frequent elevation adjustments. Paying attention to these factors will guide you in finding a zero distance that balances practical shooting distances with minimal point-of-impact deviation, enhancing overall shooting performance.
Environmental and practical factors
The best distance to zero a red dot sight depends heavily on several environmental and practical factors that influence accuracy and usability. Lighting conditions and visibility play a significant role, as bright sunlight or low light can affect how clearly the red dot appears against the target, potentially requiring adjustments to the sight’s brightness or the zeroing distance to maintain precision.
Wind and weather influences further complicate the matter, as gusts or changing atmospheric conditions can alter bullet trajectory, so selecting a zero distance that minimizes holdover adjustments under typical local conditions can improve overall shooting consistency. Taking these factors into account helps in determining a suitable zero distance that enhances performance and reliability when using a red dot sight in real-world scenarios.
Purpose and use case considerations
Determining the best distance to zero a red dot involves understanding the relationship between the intended shooting range and the environment where the firearm will be used. When zeroing a red dot, factors such as the type of firearm, its caliber, and the typical size and movement of targets play an important role in deciding the ideal distance.
For close to medium ranges, many shooters prefer zeroing at distances between 25 to 50 yards, which often balances point of impact for both near and moderately distant targets. Firearms with larger calibers might require adjustments to account for bullet trajectory, while smaller calibers can maintain more consistent accuracy over these distances. Considering whether targets are stationary or moving helps determine whether a shorter zeroing distance is better for rapid target acquisition or a longer distance better suits precise shots.
Taking time to test different distances in the specific shooting conditions will help select a zeroing point that complements the intended use, ensuring accuracy and confidence when aiming with a red dot sight.
Red dot sight features influencing zero distance
Choosing the best distance to zero a red dot involves understanding how certain sight features affect accuracy and ease of use. The size and clarity of the reticle play a key role, as a smaller, crisp dot allows for precise aiming at various distances without obscuring the target, while a larger reticle might be better for quick target acquisition.
Red dot sights that minimize parallax make aiming more forgiving since the point of impact remains consistent even if the shooter’s eye position shifts, which complements generous eye relief that provides comfort and flexibility during use. Ease of adjustment is another important aspect; a red dot with a wide adjustment range and clearly marked turrets allows for fine-tuning the zero quickly, making it simpler to adapt the sight to different shooting distances or environmental conditions. Overall, understanding how these features interact helps in selecting the right zero distance, whether using the red dot for close quarters or longer-range shots.
Testing and finetuning your zero
When working with the best distance to zero a red dot, the process involves several practical steps that help in achieving precise alignment. Testing and finetuning your zero often start by selecting a stable platform or rest to reduce movement during adjustments.
Methods for confirming zero distance typically include firing groups at incremental distances and adjusting the sight accordingly, while tools and accessories for accuracy, such as bore sights, laser alignment devices, or calibration targets, can significantly aid in quicker and more reliable setup. Regular maintenance and rezeroing frequency depend largely on how often the equipment is used and whether it experiences impacts or environmental changes; keeping the red dot clean and securely mounted contributes to consistent performance. Paying attention to these factors allows for reliable targeting and improves overall accuracy during use.
Frquently Asked Questions
Of course! Please provide the question you’d like me to answer.
Sure! Please provide the question you’d like me to answer.
When Determining The Best Distance To Zero A Red Dot Sight, Several Factors Come Into Play. One Of The Primary Considerations Is The Intended Use Of The Firearm. For Close-Quarters Scenarios, Such As Home Defense Or Tactical Situations, Zeroing At A Shorter Distance, Typically Around Yards, Makes Sense Because It Allows For Quick Target Acquisition And Accurate Hits At Close To Moderate Ranges. On The Other Hand, For Hunting Or Long-Range Shooting, Zeroing At A Greater Distance, Like Or 1Yards, Provides Better Accuracy For Targets Farther Away.
When determining the best distance to zero a red dot sight, the firearm’s intended use is a key factor. For close-quarters or tactical scenarios, zeroing at a shorter distance, usually around 7 to 10 yards, allows for faster target acquisition and improved accuracy at close to moderate ranges. Conversely, for hunting or long-range shooting, zeroing at a greater distance, such as 25 or 50 yards, enhances accuracy on distant targets. Selecting the appropriate zero distance ensures the red dot sight performs optimally for specific shooting needs.
What Factors Should Be Considered When Choosing The Best Distance To Zero A Red Dot Sight?
When choosing the best distance to zero a red dot sight, consider the typical engagement range where you expect to use your firearm. For close-quarters or self-defense situations, zeroing at 7 to 10 yards ensures quick target acquisition and accuracy at short distances. For general-purpose or hunting use, zeroing at 25 to 50 yards balances accuracy at both nearby and moderate distances. Additionally, factors such as bullet trajectory, firearm caliber, and personal shooting preferences play a role. Understanding the bullet drop and how the red dot impacts point of aim at different distances helps optimize performance for your specific needs.
Sure! Please provide the question you’d like me to answer.
Another Important Factor Is The Ballistic Trajectory Of The Round You Are Using. Because Red Dots Do Not Have Magnification, You Rely Heavily On Understanding Bullet Drop And How It Affects Your Point Of Impact At Various Distances. Zeroing The Red Dot At An Optimal Distance Reduces The Need For Holdover Or Adjustments When Engaging Targets Within Your Typical Engagement Range. Additionally, Shooter Preference And Physical Characteristics Of The Firearm, Including Barrel Length And Sight Height Over Bore, Also Influence The Ideal Zero Distance.
The ballistic trajectory of your ammunition significantly impacts the effectiveness of a red dot sight. Since red dots lack magnification, understanding bullet drop at different ranges is crucial to maintain accuracy. Zeroing your red dot at an optimal distance minimizes the need for holdover or frequent adjustments, improving hit probability within common engagement distances. Moreover, factors such as shooter preference and the firearm’s physical attributes—like barrel length and sight height over bore—play a vital role in determining the best zero distance. These elements ensure the zeroing process matches both the shooter’s style and the weapon’s characteristics.
Sure! Please provide the question you’d like me to answer.
How Does Zeroing A Red Dot At Yards Compare To Zeroing It At Yards?
Zeroing a red dot sight at different yardages affects its point of impact and usability. When zeroed at a shorter distance, such as 25 yards, the red dot aligns closely with the bullet impact nearby, making it ideal for quick target acquisition in close-range encounters. However, at longer distances, the bullet drop becomes more pronounced, requiring holdover adjustments. Conversely, zeroing at a longer range like 100 yards provides a more accurate point of impact for mid-range targets. This setup benefits shooters engaging targets at varied distances but may require compensation for shots under 25 yards. Choosing the zero distance depends on the primary shooting range and purpose.
Sure! Please provide the question you’d like me to answer.
Conversely, Zeroing At Yards Allows The Shooter To Extend Accurate Shooting Ranges. When Zeroed At Yards, The Bullet Will Generally Impact Slightly Low At Very Close Ranges (Under Yards) But Will Be More Precise Out To Ranges Of To 1Yards Or More. This Is Particularly Advantageous For Hunters Or Precision Shooters Who Need To Engage Targets At Medium Distance. However, Zeroing At This Distance May Require Shooters To Adjust Their Point Of Aim For Very Close Targets Due To The Bullet Trajectory Arc.
Zeroing at longer yards enables shooters to maintain accuracy over extended distances, typically from 100 to 200 yards or beyond. While the bullet may strike slightly low at very close ranges, this setup benefits hunters and precision shooters by providing more precise impacts on medium to long-range targets. However, this approach demands that shooters adjust their aim for close-range shots because of the bullet’s curved trajectory. Understanding and compensating for this bullet drop at shorter distances is essential to ensure effective targeting across various ranges.
Zeroing A Red Dot At Yards Is Commonly Chosen For Close- To Mid-Range Shooting Scenarios. At This Distance, The Bullet’S Trajectory Is Such That The Point Of Impact Closely Matches The Point Of Aim For Targets Within Approximately 0 To Yards. This Zero Distance Allows Quick Target Acquisition And Less Holdover Within This Range, Making It Ideal For Home Defense Or Tactical Use. However, Beyond Yards, The Shooter May Notice A More Significant Bullet Drop, Requiring Adjustments Or Holdover.
Zeroing a red dot sight at a specific yardage is common for close- to mid-range shooting because it aligns the point of aim with the bullet’s point of impact within that range. This setup allows for quick target acquisition and minimal holdover, which is especially useful in home defense or tactical situations where speed and accuracy are crucial. However, beyond the zeroed distance, bullet drop becomes more pronounced, meaning shooters need to make adjustments or use holdover to compensate. Understanding this helps optimize performance based on the intended shooting scenarios.
Sure! Please provide the question you’d like me to answer.
Of course! Please provide the question you’d like me to answer.
Sure! Please provide the question you’d like me to answer.
Sure! Please provide the question you’d like me to answer.
Why Is It Important To Understand Bullet Trajectory When Zeroing A Red Dot Sight?
Understanding bullet trajectory when zeroing a red dot sight is crucial because it ensures accuracy at various distances. Since bullets follow a curved path due to gravity, knowing the trajectory helps shooters adjust the sight so the point of aim matches the point of impact precisely where intended. Additionally, this knowledge allows for better shot placement and anticipation of bullet drop over distance. Properly zeroing the sight based on trajectory minimizes errors, improving overall shooting performance and effectiveness in real-world scenarios.
Understanding Bullet Trajectory Is Critical When Zeroing A Red Dot Sight Because It Affects Your Point Of Impact At Different Distances. Unlike Iron Sights Or Scopes With Magnification And Reticles That Account For Bullet Drop, A Red Dot Sight Generally Projects A Simple Dot With No Inherent Holdover References. Therefore, Knowing How Your Bullet Travels—Where It Rises Or Drops Relative To The Line Of Sight—Enables You To Choose A Zero Distance That Minimizes The Need For Adjustments During Actual Shooting.
Understanding bullet trajectory is essential when zeroing a red dot sight because the sight itself provides only a simple aiming point without any built-in indication of bullet drop or rise. Unlike scopes with reticles that account for bullet trajectory, a red dot projects a single illuminated dot, so knowing how your bullet travels helps you predict where it will hit at various distances. By comprehending the trajectory, you can select an optimal zero distance that ensures the bullet impacts close to the point of aim within your typical shooting range. This reduces the need for holdover or adjustments, improving accuracy and confidence in real-world shooting scenarios.
Moreover, Knowledge Of Bullet Trajectory Allows You To Anticipate Where Your Rounds Will Hit At Intermediate Distances. For Example, If You Zero A Red Dot At Yards, Your Rounds Will Typically Hit Slightly Above Or Below The Point Of Aim Past This Distance Due To The Bullet’S Parabola. By Understanding This Arc, You Can Better Predict The Effective Range Of Your Zero And Apply Natural Holdover Or Holdunder Without Fumbling For Adjustments. This Ultimately Improves Accuracy And Confidence In A Variety Of Shooting Situations.
Understanding bullet trajectory is crucial for anticipating where your shots will land at various distances. When you zero a red dot sight at a certain range, the bullet’s path follows a curved arc, meaning rounds may strike slightly above or below the point of aim beyond that distance. By grasping this parabolic flight, you can predict your zero’s effective range and intuitively apply natural holdover or holdunder. This skill enhances shooting accuracy and builds confidence, especially in dynamic or rapidly changing shooting scenarios.
Sure! Please provide the question you’d like me to answer.
Sure! Please provide the question you’d like me to answer.
How Does The Height Of A Red Dot Sight Over The Bore Affect The Zero Distance?
The height of a red dot sight over the bore significantly affects the zero distance because the sight’s line of sight and the bullet’s trajectory originate from different vertical points. A higher mounting height means the sight line is elevated above the bore axis, requiring the bullet’s curved trajectory to intersect the sight line at a specific distance for accurate zeroing. As a result, increasing the sight height generally shifts the zero distance farther downrange. Shooters must adjust zeroing to account for this offset, ensuring the point of impact aligns with the point of aim at the desired distance.
The Height Of The Red Dot Sight Above The Bore Axis Is A Significant Factor In Determining The Best Zero Distance. Because The Red Dot Is Mounted Above The Barrel, The Bullet’S Trajectory And The Sight Line Are Not Aligned But Cross At Two Points: Once On The Way Up And Once On The Way Down. This Means That The Bullet Will Impact Differently At Various Distances Depending On The Difference In Vertical Height Between The Bore And The Sight.
The height of the red dot sight above the bore axis plays a crucial role in finding the optimal zero distance. Since the sight is positioned above the barrel, the bullet’s path and the sight line intersect twice—once while rising and once while falling. This causes the bullet to impact the target differently at various ranges. Because of this vertical offset, the bullet trajectory and sight line are not perfectly aligned except at those two points. Understanding this relationship helps shooters adjust their zero distance for better accuracy and consistent shot placement across different distances.
Sure! Please provide the question you’d like me to answer.
Sure! Please provide the question you’d like me to answer.
A Red Dot Mounted Higher Over Bore Tends To Require A More Specific Zero Distance So That The Bullet’S Path Intersects With The Sight Line At Desired Points. For Example, On Rifles With Optics Mounted On A Riser Several Inches Above The Bore, Shooters Might Choose A Zero Distance Of Or Yards Rather Than Yards To Ensure The Bullet Impacts Near The Point Of Aim At Typical Engagement Distances. Lower-Mounted Red Dots, Such As Those On Handguns Or Carbines, Can Often Be Zeroed At Closer Ranges Due To Less Vertical Offset. Considering This Factor Helps Shooters Select A Zero Distance That Maximizes Accuracy Across The Range.
A red dot sight mounted higher above the bore requires a more precise zeroing distance because the bullet’s trajectory needs to intersect the sight line at specific points. For rifles with optics elevated several inches, shooters often opt for a zero distance of 50 or 100 yards instead of shorter distances, ensuring the bullet hits near the point of aim at common engagement ranges. In contrast, lower-mounted red dots, typical on handguns or carbines, have less vertical offset and can be zeroed effectively at closer distances. Understanding this helps shooters choose the optimal zero distance for improved accuracy.
Can Zeroing At Multiple Distances Improve The Practicality Of A Red Dot Sight?
Yes, zeroing a red dot sight at multiple distances can enhance its practicality by allowing shooters to quickly adapt to various shooting scenarios. Instead of relying on a single zero, having multiple reference points helps compensate for bullet drop and target distance changes, improving accuracy without complex adjustments. However, red dot sights are typically optimized for close to mid-range shooting, so while multi-distance zeroing adds versatility, it may not fully substitute for specialized optics designed for long-range precision. It’s a useful technique for increasing a red dot’s effectiveness across different ranges.
Sure! Please provide the question you’d like me to answer.
While Red Dots Lack Magnification, Which Limits Precision At Extreme Distances, Zeroing At Multiple Distances Helps Shooters Learn The Bullet’S Trajectory Pattern And Develop Natural Aiming Points For Various Target Distances. It Also Allows Effective Use Of The Red Dot In Tactical, Hunting, Or Competition Settings Where Engagement Distances May Vary. Using Multiple Zeroes Improves Adaptability, Ensuring The Red Dot Remains Practical And Reliable Across The Shooter’S Typical Range Of Use.
Red dots do not offer magnification, which can reduce precision at long distances. However, zeroing the sight at multiple distances helps shooters understand the bullet’s trajectory and develop natural aiming points for different ranges. This approach enhances the red dot’s effectiveness in various scenarios such as tactical operations, hunting, or competitions where target distances change frequently. By using multiple zeroes, shooters increase their adaptability, ensuring the red dot sight remains practical and reliable throughout their typical shooting range.
Zeroing A Red Dot Sight At Multiple Distances Can Enhance Its Versatility And Usefulness In Diverse Shooting Scenarios. Some Shooters Adopt A “Two-Distance Zero” Approach, Where They Establish A Primary Zero At A Shorter Range Like Yards And Confirm A Secondary Zero At A Longer Range Like Or 1Yards. This Method Provides More Confidence And Accuracy When Engaging Targets At Both Close And Medium Distances Without Requiring Constant Sight Adjustments.
Zeroing a red dot sight at multiple distances improves its adaptability across various shooting conditions. By setting a primary zero at a closer range, such as 25 yards, shooters ensure quick target acquisition and accuracy for nearby targets. Confirming a secondary zero at a longer distance, like 50 or 100 yards, allows effective engagement of medium-range targets without adjusting the sight. This “two-distance zero” technique enhances shooter confidence and precision, making the red dot sight more versatile for different scenarios.
Conclusion
Choosing the best distance to zero a red dot significantly influences both accuracy and speed when aiming. Closer zeroing distances offer quick target acquisition for short-range engagements but may limit precision at longer ranges, while farther zero settings improve long-range accuracy but can complicate rapid shooting at close quarters. This balance means the optimal zero distance depends largely on your typical shooting scenarios and personal preferences.
For those focusing on tactical or close-quarters shooting, a shorter zero distance around 10 to 20 yards often works well. Meanwhile, shooters engaging at varied ranges might prefer zeroing between 25 to 50 yards to achieve versatility.
Understanding these factors will help you decide if the red dot sight fits your needs, making it a practical choice for a wide range of users without overpromising performance in every situation.